Webpack 搭建 TS 环境
安装环境
npm init -y
npm install -g typescript
npm install -D webpack-cli

npm install -D @typescript-eslint/eslint-plugin
npm install -D @typescript-eslint/parser
npm install -D eslint
npm install -D source-map-loader
npm install -D ts-loader
npm install -D webpack
编写 TS 配置
编写 TS 配置文件 tsconfig.json
{
  "compilerOptions": {
    "outDir": "./dist",
    "allowJs": true,
    "noImplicitAny": true, //不允许使用 any
    "module": "es6",
    "target": "es5",
  },
  "include": [
    "./src/**/*"
  ],
  "exclude": [
    "node_modules",
    "**/*.spec.ts"
  ]
}
也可以直接:
npx tsc --init
生成配置文件
其中 tsconfig.json 文件的常用配置
{
  "compilerOptions": {
    // 允许从没有设置默认导出的模块中默认导入。这并不影响代码的输出,仅为了类型检查。
    "allowSyntheticDefaultImports": true,

    // 解析非相对模块名的基准目录
    "baseUrl": ".",

    "esModuleInterop": true,

    // 从 tslib 导入辅助工具函数(比如 __extends, __rest等)
    "importHelpers": true,

    // 指定生成哪个模块系统代码
    "module": "esnext",

    // 决定如何处理模块。
    "moduleResolution": "node",

    // 启用所有严格类型检查选项。
    // 启用 --strict相当于启用 --noImplicitAny, --noImplicitThis, --alwaysStrict,
    // --strictNullChecks和 --strictFunctionTypes和--strictPropertyInitialization。
    "strict": true,

    // 生成相应的 .map文件。
    "sourceMap": true,

    // 忽略所有的声明文件( *.d.ts)的类型检查。
    "skipLibCheck": true,

    // 指定ECMAScript目标版本
    "target": "esnext",

    // 要包含的类型声明文件名列表
    "types": [

    ],

    "isolatedModules": true,

    // 模块名到基于 baseUrl的路径映射的列表。
    "paths": {
      "@/*": [
        "src/*"
      ]
    },
    // 编译过程中需要引入的库文件的列表。
    "lib": [
      "ESNext",
      "DOM",
      "DOM.Iterable",
      "ScriptHost"
    ]
  },
  "include": [
    "src/**/*.ts",
    "src/**/*.tsx",
    "src/**/*.vue",
    "tests/**/*.ts",
    "tests/**/*.tsx"
  ],
  "exclude": [
    "node_modules"
  ]
}
编写 ESlint 配置文件 .eslintrc.js
module.exports = {
  parser: '@typescript-eslint/parser', //定义ESLint的解析器
  extends: ['plugin:@typescript-eslint/recommended'], //定义文件继承的子规范,官方推荐规则
  plugins: ['@typescript-eslint'], //定义了该eslint文件所依赖的插件
  parserOptions: {
    project: './tsconfig.json' // 类型信息
  },
  rules: {
    '@typescript-eslint/no-inferrable-types': 'off' // 关闭类型推断
  },
  env: {
    //指定代码的运行环境
    browser: true,
    node: true
  }
}
配置 WebPack 的配置文件 webpack.config.js
const path = require('path')

module.exports = {
  entry: './src/ts/tileController.ts',
  output: {
    filename: 'bundle.js',
    path: path.resolve(__dirname, 'dist')
  },
  module: {
    rules: [
      {
        test: /\.tsx?$/,
        exclude: /(node_modules|bower_components)/,
        use: {
          loader: 'ts-loader'
        }
      }
    ]
  },
  resolve: {
    extensions: ['.tsx', '.ts', '.js']
  }
}
在 package.json 添加上指令
"dev": "webpack --mode development",
"build": "webpack --mode production",
"lint": "eslint src --ext .js,.ts"
TS 自动编译
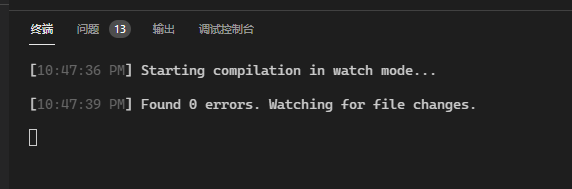
这个直接 VsCode 打开
终端 ->运行任务 -> typescript ->“tsc: 监视 - tsconfig.json (ts)”
Source Map是什么
看上面的配置,可以发现有一个
// 生成相应的 .map文件。
"sourceMap": true,
简单地说 Source Map 就是一个文件,里面是转换代码的代码位置和转换前的代码位置的映射信息,这样当前程序报错时,我们可以找到开发态代码位置。
如何生成 Source Map
TypeScript 在编译时可以同附带参数生成,命令如下:
tsc --sourcemap Person.ts
执行后,会在同目录下生成名为 Person.js.map 文件,这就是 Source Map 文件,内容如下:
{
    "version": 3,
    "file": "Person.js",
    "sourceRoot": "",
    "sources": [
        "Person.ts"
    ],
    "names": [],
    "mappings": "AAAA;IAGI,gBAAY,IAAW,EAAE,GAAU;QAC/B,IAAI,CAAC,IAAI,GAAG,IAAI,CAAC;QACjB,IAAI,CAAC,GAAG,GAAG,GAAG,CAAC;IACnB,CAAC;IAED,oBAAG,GAAH;QACI,MAAM,CAAI,IAAI,CAAC,IAAI,YAAO,IAAI,CAAC,GAAG,eAAY,CAAC;IACnD,CAAC;IACL,aAAC;AAAD,CAAC,AAXD,IAWC;AAED,IAAI,IAAI,GAAG,IAAI,MAAM,CAAC,MAAM,EAAE,EAAE,CAAC,CAAC;AAElC,QAAQ,CAAC,IAAI,CAAC,SAAS,GAAG,IAAI,CAAC,GAAG,EAAE,CAAC"
}
该文件是一个 json 格式,分别记录编译前文件和编译后文件信息
Source Map 如何使用
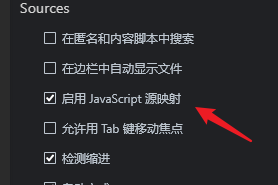
目前,暂时只有 Chrome 浏览器支持这个功能。
在 Developer Tools 的 Setting 设置中,确认选中 "Enable source maps"。
同时需要在编译的 js 代码加上以后信息(编译时已自动加上了)
//# sourceMappingURL=Person.js.map
注意 Person.js.map 是一个路径,Source Map 文件可以是本地文件,也可以是网络文件
这样可以了像调试 js 代码一样调试 TypeScript 了
